Build LED torch ("Torch") with SmartLEDs
New: also with matter integration (beta, details see here)
Attention - Uncorrected machine translation
This English version of the following text is currently 100% machine translated. In case of ambiguity, please refer to the German version (which in this case is the original written by hand).
Matter support available as beta!
The P44-LC-X and P44-DSB-X image are also available as beta versions with matter integration (for details see here)
background story
The fire/torch animation available today in the P44-xx grew out of the very first plan44 SmartLED project, the messagetorch, in early 2013. At that time, it was a replica attempt of an exhibit at 30C3 in Hamburg, whose functionality had been explained verbally by the developer. From this hearsay (code was not yet published at that time) the first version (for the Spark/Particle core) was created.
Only later I found out that this developer is Simon Budig (who works on the free image processing program GIMP). In 2016 he published the code of his "flame" for Arduino on github.
Material
This tutorial requires an operational P44-DSB-X (for operation with Digital Strom) or P44-LC-X (standalone) on a RaspberryPi. For those who don't have one yet: The manual here explains how to build it yourself with the free SD card images from plan44 and a standard RaspberryPi.
The P44-xx can handle the SmartLEDs from the WS281x series. The oldest and meanwhile cheapest LED strips are the ones with the WS2812(B) chip. For 5V strips, the latest is the WS2813(B) chip, which has a backup data line, so failures of individual LEDs in the chain do not cripple the whole rest of the chain. In addition, the color rendering is better and the timing for the data is less delicate. This makes WS2813(B) more suitable for reliable and long-lasting installations (such as with P44-LC-LED).
SmartLED strips with WS2812/13 are available from various online IoT/DIY retailers, on platforms like ricardo or ebay and of course from international wholesalers like amazon and directly in China (where the material comes from anyway) at aliexpress. Prices vary enormously - the same 5m strip WS2813 with 60 LED/m is offered from CHF 25 to CH 150. It depends on your budget versus your patience, which source is the best ;-)
Setup
In itself, it's simple - wind a WS281x LED chain onto a cylinder, done.
The following video shows this in the simplest variant with a cardboard tube and 5m WS2813 LED strips (with 60 LED/m). This results in a torch of 30-50cm height, depending on how tightly the strip is wound:
The video shows at the end the counting of the LEDs - we need later the number of LEDs around and the number of windings for the configuration! In the example there are 17 LEDs all around in 19 turns.
Depending on the thickness of the tube, the LED grid does not match the tube circumference - this leads to a slightly slanted "projection surface", but especially for the torch animation this looks almost better than 100% vertically stacked LEDs.
A more elegant flare (like the one in the animation at the very top) is achieved by using a plexiglass tube, and wrapping an LED strip inside the tube. This works relatively well with LED chains supplied by a square silicone tube (the "waterproof" or at least water-protected variants). Possibly first wrap it around a thinner auxiliary tube, then insert it into the Plexi tube and then unwind it by turning the auxiliary tube to the inner surface of the Plexi tube.
Connecting the LED chain to the Raspberry Pi.
For effects like the "Torch", where only a few of the LEDs are lit at a time, the LED chain can be connected directly to the RPi, and from the normal RPi power supply (which can supply 5-15W depending on the model).
Attention - watch current consumption
One LED color (red, green or blue) in full brightness needs about 100mW, i.e. a full white LED (R=G=B=100%) needs about 1/3 Watt. A 5m LED chain with 60 LEDs/m has 300 LEDs. If all of them have to shine fully white, this would need 300 * 1/3 W i.e. approx. 100 Watt!!!. That is 10-20 times what a standard RaspberryPi-5V power supply delivers! The current flowing at 5V would be 100 W / 5V = 20A. Even if the power supply would deliver that, that's way too much current for the thin cables and connectors. So without large power supplies and thick additional cables along the LED strip, full brightness of all LEDs is impossible.
The following video shows to which pins of the RPi the connector for the LED chain (one of them should be included in every package of WS281x LEDs) has to be connected.
- White is the negative pole of the power supply, and must be connected to "Ground" (often abbreviated as "GND").
- Red is the positive pole of the power supply, and must be connected to "5V Power".
- Green is the data line, and must be connected to GPIO18.
WS2813 LEDs with backup data line - do not connect
While WS2812 LED chains have only the three mentioned connection wires (white, red, green), WS2813 has another blue connection wire. This wire must not be connected at the beginning of the LED chain, but must remain open. Only when several chains are connected in line, the blue wire must also be connected at the connection point from one chain to the next. Some recommendations found on the internet suggest to connect the blue and the green wire at the beginning of the chain, that is not a good idea - this works with older WS2813 sometimes, but not with newer ones, or may cause LEDs no longer being addressable individually, but only in pairs.
Now, here's the video:
Now the torch is ready to run from the hardware!
Configuration of the LED layout.
Rather than video?
The whole process from here to the end of the tutorial is also available as a silent, largely uncommented video, at the very end. The video is not intended to be the sole tutorial, but rather an illustration of the steps, which are described more precisely in the text below.
For a comfortable "playing" of the torch surface we want to be able to control it also in the software as "drawing surface" in a X-/Y-coordinate system.
For this we have to "explain" to the software how the LEDs are arranged on the surface. By default, the P44-xx assumes that the LEDs are all in a line, i.e. a "surface" with only 1 pixel height and the width corresponding to the number of LEDs in the chain.
But in the torch shown in the video above, we have an area of 17 pixels horizontally (X-direction = cylinder circumference) and 19 pixels vertically (Y-direction, cylinder height). The strip is wrapped around to the left, i.e. the running direction of the strip is opposite to the usual left-to-right X-direction.
With this info in mind we now open the interactive input page for script commands, the so called REPL (For more details see here).
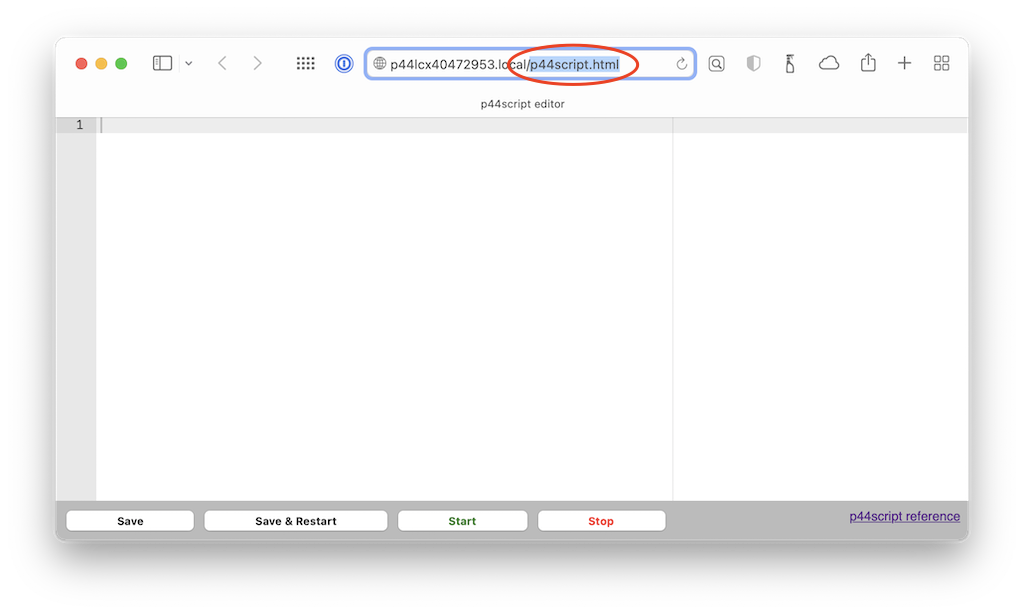
To do this, the index.html in the address line of the browser must be replaced by repl.html:
Use IDE from firmware version 2.7.0/2.7.0.27
As of 2.7.0/2.7.0.27, the much more convenient p44script IDE can be used instead of the simple REPL. This can be found on the page "ide.html" or can be opened by clicking the corresponding button "Show p44script IDE..." on the "System" tab. The commands shown in the following can be entered in the window at the bottom left of the IDE instead of in the REPL.
LED simulator available from firmware version 2.7.0/2.7.0.32
As of 2.7.0/2.7.0.32, there is an in-built LED simulator that can be used to inspect the entire view hierarchy. The simulator can be opened using the corresponding button "LED Sim..." on the "System" tab or the pixelated button at the bottom right of the IDE. When called up, the simulator shows the same image as the connected LEDs, but each view can also be viewed individually using the pop-up menu at the top left.
In this window we can now interactively query, change and test the layout:
ledchaincover()(type it and then press the "Execute" button).
Result:
/* json */
{
  "x": 0,
  "y": 0,
  "dx": 256,
  "dy": 1
}
ledchaincover() returns the area currently covered by LEDs. As mentioned above, this is by default for a linear rolled out strip with all LEDs on one line. So this has to be changed now (for details see here):
// remove the current configuration
removeledchains()

// In the example there are 300 WS2813 LEDs (GRB order of color channels),
// and the "Torch" has 17 LEDs per turn and 19 turns in total.
// The LEDs are wound from right to left (X backwards) -> X option
addledchain("WS2813.GRB:rpi:300:0:17:0:19:X")
Now the area covered by LEDs looks different:
ledchaincover()Result:
/* json */
{
  "x": 0,
  "y": 0,
  "dx": 17,
  "dy": 19
}
This alone is not enough; now the "drawing area" of the graphics system must also be adapted to the new size. That is, the so-called root view of the low resolution graphic system (lrg) must be reconfigured:
lrg.configure(ledchaincover()).set("fullframe",true)Result:
/* lrgView */
{}
This completes the configuration of the "drawing area" (the rootview) for a 17*19 pixel display on the torch.
If you want to inspect the (now still) empty rootview, type:
lrg.status()Result:
{
  "type": "stack",
  "label": "rootview",
  "x": 0,
  "y": 0,
  "dx": 17,
  "dy": 19,
  "content_x": 0,
  "content_y": 0,
  "content_dx": 17,
  "content_dy": 19,
  "rotation": 0,
  "color": "FFFFFF",
  "bgcolor": "000000",
  "alpha": 255,
  "z_order": 0,
  "orientation": "right",
  "wrapmode": "clipXY",
  "mask": false,
  "invertalpha": false,
  "timingpriority": true,
  "animations": 0,
  "layers": [],
  "positioningmode": "noAdjust"
}
What each of the attributes means is described elsewhere described. But it's good to see that the rootview is now 17*19 in size, and so is its content.
First LED test
Now, to test if the whole thing works at all, we'd like to see the LEDs light up at least once! The easiest thing is to set the background color of the rootview (at the moment still: black, see property bgcolor in the result of lrg.status() above):
lrg.set('bgcolor', '#331100')Now the whole torch should glow soft orange!
The #331100 is to be understood as a web color, like in HTML/CSS, so #RRGGBB, with RR=red part as hexadecimal number from 0..FF, GG=green, BB=blue. The '#' can also be omitted.
Attention, don't turn it up too much!
Who is now tempted to enter '#FFFFFF' for full white, should not do that! It would mean the immediate crash of the RaspberryPi, and possibly also the power supply could be damaged!. Because as explained above, 300 LEDs on full white would need ~100W! Up to about '#333333' (=20% brightness, about 3% of power) it should be enough.
Current consumption or power limitation.
To prevent the brightness of an animation from exceeding the capabilities of the power supply and causing crashes, or even harming the power supply, there is a powerlimit mechanism built into the software.
How much electrical power does this soft orange need?
currentledpower()Result:
2045 // numericThis value is to be understood as mW (milliwatt, 1/1000 watt), so the orange needs about 2W. This is not a measurement but a calculated value based on the currently set LED colors.
With the vast majority of Rpi power supplies, it should be possible to consume in the range of 4W for the LEDs (in addition to what the Rpi itself needs). So let's limit the LED consumption to 4W to be on the safe side:
setmaxledpower(4000)This causes that the total brightness of all LEDs is always reduced so that they never consume more than 4000mW = 4W. That means, no matter how high the desired brightness is set, it always stays below the 4W. Therefore, full brightness may now be requested:
lrg.set('bgcolor', '#FFFF')Now the torch is white, but very moderately bright.
currentledpower()...now gives something close to the set limit of 4000 (but not exactly, because the brightness can't be controlled arbitrarily precisely).
But how much power would be needed to make the LEDs shine like the current color setting actually demands? For this you can use neededpower():
neededledpower()Result:
83657 // numericThat would be 84W! Not quite the 100W calculated above, but in the same order of magnitude.
So the current limitation helps to try out effects without the Raspberry crashing all the time. By comparing the output of currentledpower() and neededledpower() you can see if and how far the current limiter is currently intervening and reducing the brightness.
Test the LED layout
With changing the background color alone it is not possible to see if the LED layout really fits on the torch (approx.) in both directions, so if the counted 17*19 (in my example) are correct. But if the illuminated section is shifted, it does:
// Back to the orange
lrg.set('bgcolor', '#331100')
// Move to the top
lrg.set('y', 5)
...and poof, the lowest 5 turns of the torch should be dark. Because the rootview, i.e. the orange 17*19 square has been moved up by 5 pixels. Analogously downwards:
lrg.set('y', -5)The same goes horizontally:
// Y back to 0
lrg.set('y', 0)
// now move X by two pixels
lrg.set('x', 2)
This now causes a dark vertical stripe 2 pixels wide along the "seam", that is, where the 17th pixel of the winding meets the 1st pixel of the next winding.
Depending on the winding, the stripe is more or less vertical, but since the number of LEDs once counted around the tube seldom exactly add up, and therefore the LEDs of the individual windings are not exactly on top of each other, the stripe is mostly slanted to one side or the other. In my example I noticed that 17 was too generous, and 16 would be better.
What to do?
Quite simple, the layout can be readjusted at any time:
removeledchains()
addledchain("WS2813.GRB:rpi:300:0:16:0:19:X")
lrg.configure(ledchaincover()).set("fullframe",true)
These are the same commands as described in detail above, this time just with 16 for the number of LEDs around instead of 17.
Now do the X-shift test again:
lrg.set('x', 2)And already the black stripe appears quite vertical.
Permanently saving the LED layout
If everything worked so far, the correct LED layout configuration is found. However, if now the Raspberry restarts, these interactively given commands are forgotten and the state is like at the beginning - suitable for a line, but not for the torch.
Since we don't want to type in the layout every time, we put the configuration commands into the so called mainscript. This is a script (program) which is started automatically when the P44-Raspberry is started.
The interface to enter and modify the mainscript can be found on the page "p44script.html":
Use IDE from firmware version 2.7.0/2.7.0.27!
As of 2.7.0/2.7.0.27, the simple Mainscript editor has been replaced by the much more convenient p44script IDE. This can be found on the page "ide.html" or can be opened by clicking the corresponding button "Edit Mainscript..." on the "System" tab.
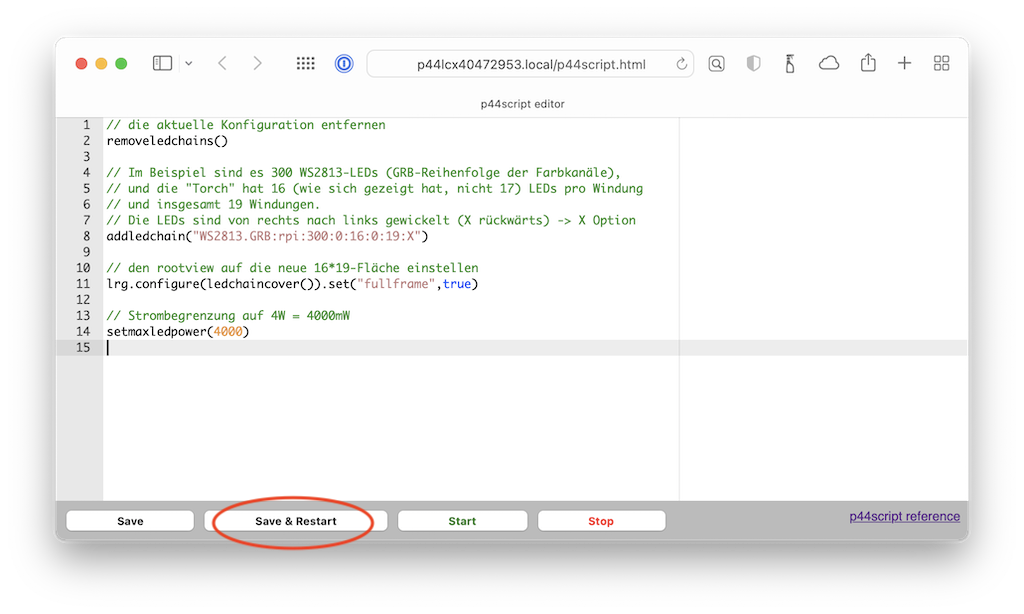
In the empty space, enter the tested LED configuration, including reasonable current limit - in our example, with some comments to help you think:
// remove the current configuration
removeledchains()

// in our example there are 300 WS2813 LEDs (GRB order of color channels),
// and the "torch" has 16 (as shown, not 17) LEDs per turn
// and 19 turns in total.
// The LEDs are wound from right to left (X backwards) -> X option
addledchain("WS2813.GRB:rpi:300:0:16:0:19:X")

// set the rootview to the new 16*19 area
lrg.configure(ledchaincover()).set("fullframe",true)

// set current limit to 4W = 4000mW
setmaxledpower(4000)
Now press "Save & restart", and from now on the RPi will start with the correct LED configuration every time.
The torch!
After all these preparations and tests (which of course work the same for other LED layouts and applications), the actual torch animation can now be set up as a "lamp".
First the Rpi should be restarted so that the torch is dark for the time being.
But it is also sufficient to enter the command restartapp() in the REPL - this does not restart the whole RPi, but the P44-app running on it (named vdcd), which is equivalent to a reboot for the following configuration (but is faster, about 10sec compared to about 1min for a complete reboot)
Abstraction 'Lights'
In the tests above we worked with the whole drawing area, changed its background color, and experimented with the position. For the operation as a light controller, however, the "drawing area" - the rootview - is not used directly (remains dark itself), but for each 'light' a separate view is created, which is then positioned as subview on the rootview. This makes it possible to place not only one but several logical lights on an LED surface like the torch - next to each other but also as layers on top of each other. The positions and also the transparency can be changed during operation, which makes an endless variety of combined effects possible. An example that will conclude this "Torch" tutorial is a ticker that moves across the torch, see below.
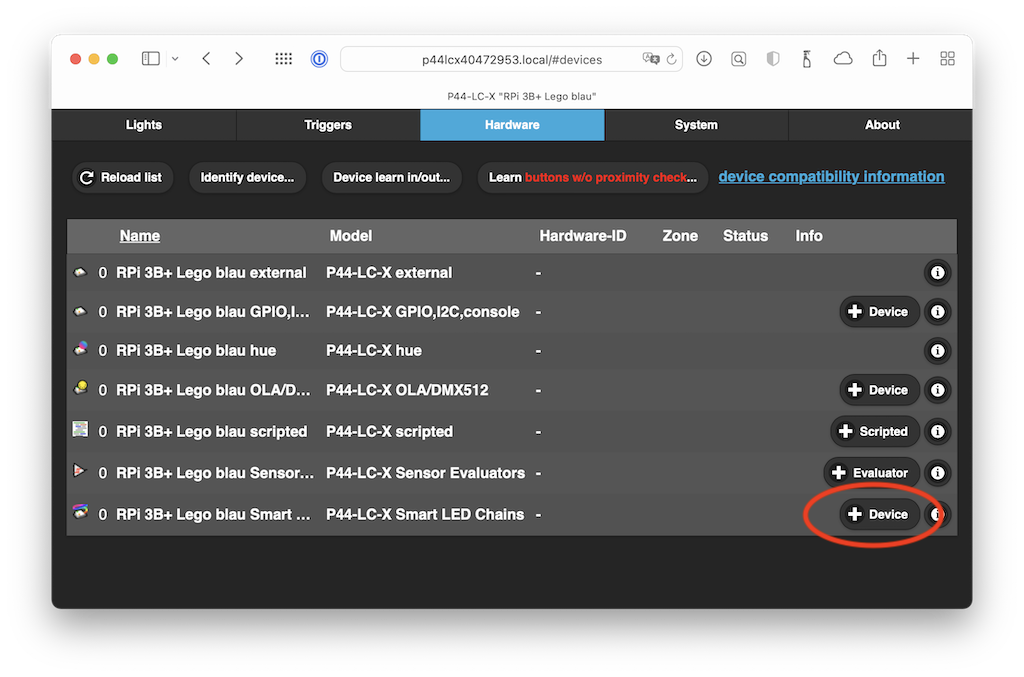
New lights are defined in the "Hardware" section of the web interface:
In the appearing dialog the fields are as shown (of course with adjusted values for size in X direction and size in Y direction, depending on the flare size).
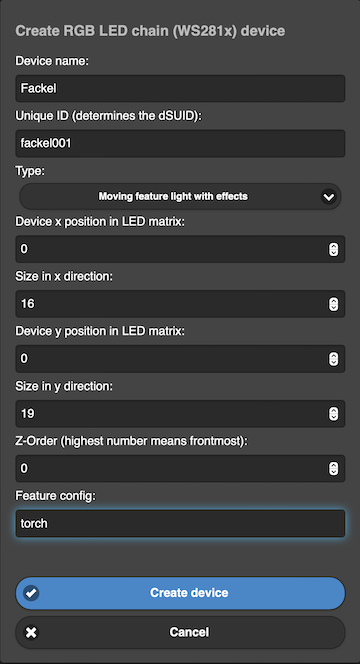
The individual fields:
- Device Name
- Name for this "light" in the web interface - for P44-DSB it also appears with this name in the Digital Strom system.
- Unique ID
- Anything can be entered here, but it must be a unique string for this luminaire, no other luminaire may use the same string.
- Device x position in LED matrix
- X position relative to the origin of the rootview for the fixture. In this example we want the "torch" fixture to cover the entire rootview, i.e. the entire torch area, so we set the view of the fixture to the origin of the rootview (x=0, y=0).
- Size in x position in LED matrix
- Size in X direction. In this example we want the fixture to cover the whole rootview, so we take the whole width here (16 in the example).
Device x position in LED matrix Y position
- Size in y position in LED matrix
- Size in Y direction.
Z-order Z-Order : in case of several superimposed luminaire levels, Z-Order determines the order. The fixture with the highest Z-order is the top layer. Here we use the torch animation as background, therefore the Z-Order* value can stay 0.
- Feature config
- This determines which type of view should be used for this fixture. If the field is empty, lightspot is assumed. We write
torchto get the torch animation. There can also be a JSON filename at this point, such as "repeatingticker.json", but more on that later.
After pressing "Create Device" nothing happens on the LEDs yet, but a light appears in the list:

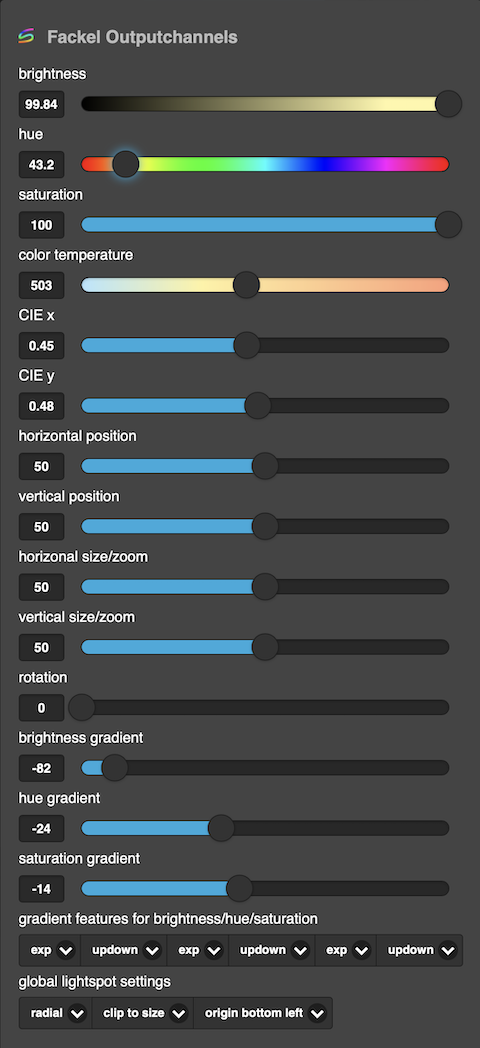
A click on the gear button opens the dialog for setting the output channels. Here you can now try out:
- brightness (brightness) with the first slider. Turn it up to 50%, and the torch animation appears in white. Not so pretty yet...
- If you want it to look like fire, red-orange is a good base color. So set the color angle (hue) e.g. times 42... Only: where is the color?
- The saturation is still at 0, therefore no color: So turn it up to 100! So it's starting to look ok.
- Now come the subtleties: With brightness gradient the radiance of the individual sparks is influenced, with hue gradient the color change.
- With gradient features you can set how the gradients run (linear, sin/cos, exponential, logarithmic).
Depending on the settings it looks completely different than after a torch...
But with the following settings you get an animation that looks very much like a fire, especially in the dark:
Save as scene
To save these settings or make them recallable, they can be saved in a scene. This is done in exactly the same way as with completely normal lights - for P44-DSB in Digital Strom via the configurator or the app, for P44-LC according to the instructions.
MessageTicker.
The original MessageTorch (see at the very top) could display a ticker above the torch animation. What was hardcoded into the C code back then, we can easily click together here as a "text lamp": In the "Hardware" tab press "Create Device..." again, but this time with the following parameters:
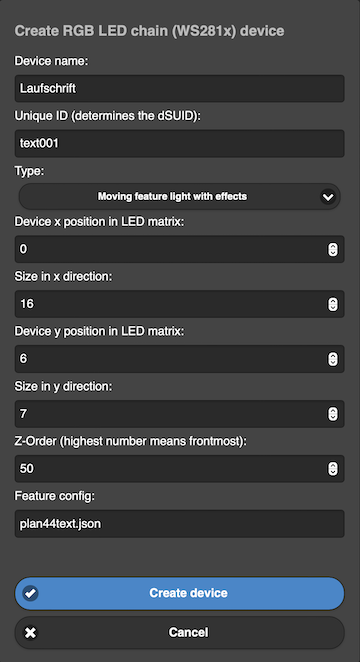
The differences to the torch setup (see above) are:
- the ticker is placed with Y=6 approximately in the center of the torch, and is only 7 pixels high
- the ticker should appear above the torch animation, not below it, so we set a higher Z-Order.
- with Feature Config
plan44text.jsonwe use a predefined configuration of views, which form a simple ticker. (If you want to know what the structure is, typejson(readfile('+/plan44text.json'))in the REPL...)
Press "Create Device", press gear button and turn up brightness a bit, set color. Now "plan44.ch feature light +++" should run over the center of the flare.
How to change the text?
In the REPL enter:
device('Laufschrift').view.findview('LIGHT').set('text', 'Happy holidays! *** ')Set scroll speed slower?
device('Laufschrift').view.set('stepx',0.5)Or faster?
device('Laufschrift').view.set('stepx',1.5)If you want to explore and experiment further: The entirety of all views can always be displayed with
lrg.status()...view. Or only the views belonging to a particular light (which can also be seen in lrg.status()):
device('Laufschrift').view.status()This brings us to the end of this tutorial - but only to the beginning of what can be done with P44-DSB and P44-XX and WS281x-SmartLEDs ;-)
Have fun experimenting!
Feedback and suggestions to this tutorial is welcome!
And here as promised...
The whole configuration as a video.
The (silent) video shows the same steps described above as a sequence with simultaneous view of the screen and the torch.