DIY P44-LC-X or P44-DSB-X
Attention - Uncorrected machine translation
This English version of the following text is currently 100% machine translated. In case of ambiguity, please refer to the German version (which in this case is the original written by hand).
P44-LC-X and P44-DSB-X are free firmware images (files) that can be copied to an SD flash card to use a RaspberryPi either as a Digital Strom gateway or as a standalone (light) control device.
Matter support available as beta!
The P44-LC-X and P44-DSB-X image are also available as beta versions with matter integration (for details see here)
What does it take?
-
A RaspberryPi B,B+, 2, 3 or 4. P44-DSB/LC-X is a very good way to use even the older B models for a long time useful. In contrast to today's Raspberry Pi OS and also the older Raspian, the P44-DSB/LC-X is tiny (~40 megabytes instead of several gigabytes) and also very frugal in terms of performance.
-
A suitable SD (micro) card. Again, almost any card ever produced will do, because (see above) the whole image is only 40 megabytes in size. If you still have 1G or 2G cards, you can use them. Also, the usually critical flash usage in Rpi projects is hardly an issue with P44-DSB/LC-X. The OpenWrt operating system and the plan44 software is designed in such a way that usually only configuration changes are written to the card.
-
A computer with SD card reader.
-
Software to write the SD card image. A very fat (265MBytes!!) but on all platforms executable solution is etcher, which is used in the following steps.
-
The correct P44 image. depending on the application:
- to extend a Digital Strom system: P44-DSB-X
- for Raspberry Pi B and B+: p44-dsb-x-rpi1-diy
- Beta wuth matter for Raspberry Pi B and B+: p44-dsb-x-rpi1-diy-beta
- for Raspberry Pi 2, 3, 3B, 3B+, 4: p44-dsb-x-rpi234-diy
- Beta with matter for Raspberry Pi 2, 3, 3B, 3B+, 4: p44-dsb-x-rpi1-diy-beta
- for a standalone (light) controller: P44-LC-X
- for Raspberry Pi B and B+: p44-lc-x-rpi1-diy
- Beta with matter for Raspberry Pi B and B+: p44-lc-x-rpi1-diy
- for Raspberry Pi 2, 3, 3B, 3B+, 4: p44-lc-x-rpi234-diy
- Beta with matter for Raspberry Pi 2, 3, 3B, 3B+, 4: p44-lc-x-rpi234-diy
- to extend a Digital Strom system: P44-DSB-X
With all that ready, you're good to go:
flash the SD card.
The following video shows the steps - on macOS - but this also works very similar on Linux and Windows:
- Download an image from plan44.ch, selection see above.
- Download the tool etcher for flashing SD cards,
- Flash the SD card with etcher.
Now the SD card is ready and can be inserted into the RaspberryPi!
Start the Raspberry Pi and find the web interface in the LAN.
Now the Raspberry can be connected to the LAN (with an Ethernet cable) and started with the SD card inserted. If you have an HDMI screen connected, you can watch the startup process, which takes about 30 seconds - but normally this is not necessary. P44-xx-X images also start without a screen connected. All operation is done over the network with a web browser.
Like many other network devices, P44-xx-X obtains an IP address via DHCP from the router in the LAN. If this IP address is known, it can be entered in a browser and the web interface appears (or the login prompt, see below).
But usually the IP address is not known at the beginning. How to find the device in the network?
-
In the case of P44-DSB-X it automatically logs on to the Digital Strom server and can be reached via its web interface (dS Configurator), see e.g. the instructions for the P44-DSB-E product.
-
In the case of the standalone P44-LC-X, there are several ways to find the correct web address. The following video shows two methods for macOS, one for Linux and one for Windows, namely:
- for macOS: with the app Localsites from plan44.ch; costs CHF 1 in the Appstore, but is OpenSource for free self-compiling.
- for macOS: with the free app Discovery - DNS-SD Browser
- for Linux using Ubuntu as an example: With the GUI app Avahi Zeroconf Browser (Of course it also works via the command line with
avahi-browse) - for Windows finally: P44-LC-X supports uPnP-SD and appears in the network environment.
If the above does not work, there are two other methods:
-
If you have access to the web interface of the LAN router, you will usually find a "DHCP Client List" there, which shows the devices found in the LAN with their IP address.
-
Finally, an HDMI screen and a USB keyboard can be connected to the RaspberryPi. This way you get directly into the OpenWrt system console (let the boot process run, then press Enter). 8-ung: On this command line you can do everything, even "bricken" the device completely. But by typing
ip addr(Enter) you can also find out the IP address; it is the one displayed foreth0:.
First steps
Login to the web interface.
Anyone who has found the right URL for the web browser via one of the methods described above will find themselves facing a login prompt.
- for P44-DSB-X the default login is
vdcadminwith the same passwordvdcadmin. - for P44-LC-X the default login is
p44lcadminwith the same passwordp44lcadmin.
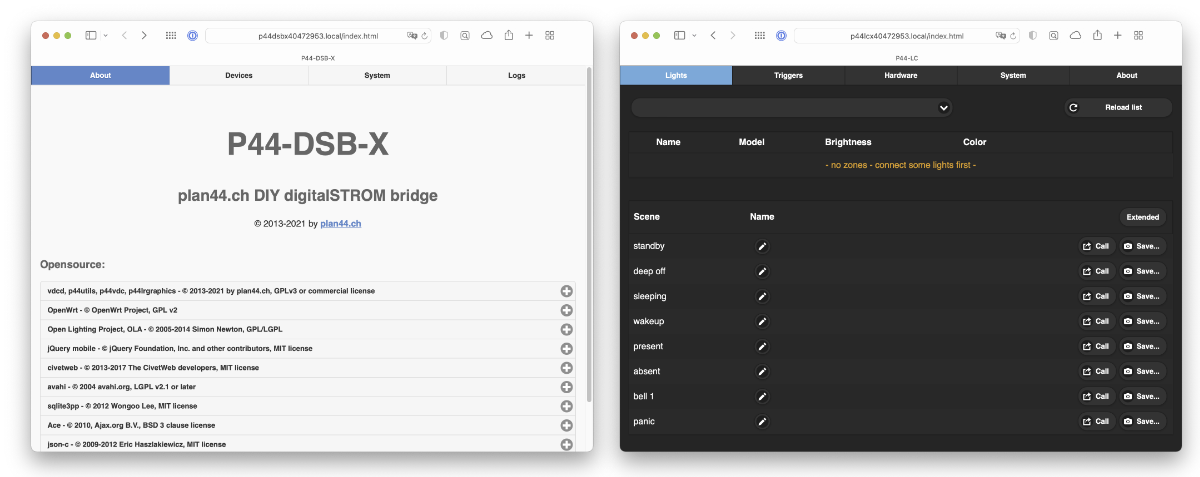
After successful login the start page appears. For P44-LC the web interface is dark, for P44-DSB it is light.
For many applications nothing more than this web interface is needed. But with the in the following section described access via ssh the OpenWrt-Linux command line can be used directly for advanced configuration, experiments, installation of additional OpenWrt packages and much more. It is worth to try this possibility, too.
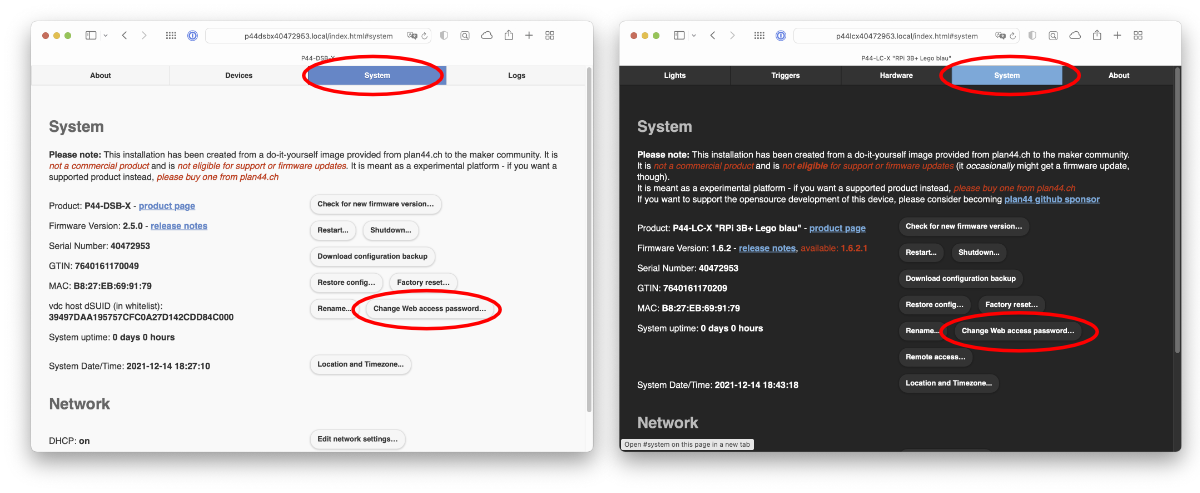
Change password!
A P44-DSB-X or P44-LC-X device is connected to the LAN and therefore normally also to the Internet. Depending on the configuration of the LAN and the device, it can also be reached from the Internet. This is why the password for the web interface should be changed to an individual password!
This can be done on the System tab with the button Change Web access password....
Login via ssh - command line.
Access via ssh, while not necessary for most applications, is often convenient. In particular, via ssh the log of the device can be displayed continuously instead of having to load the corresponding pages in the web browser over and over again.
Assuming 1.2.3.4 to be the IP address of the P44-xx-X, the ssh link is
ssh://root@1.2.3.4
On operating systems with Unix command line (macOS, Linux, FreeBSD, OpenBSD, Windows with cygwin or msys installed etc.) an ssh connection can be established simply with
ssh root@1.2.3.4
can be opened. On Windows this standard tool is missing, you can help yourself with putty to help.
The default password at P44-DSB-X and P44-LC-X for this root login is eXperiment.
If the login works, it looks something like this:
BusyBox v1.30.1 () built-in shell (ash)

  _______ ________ __
 | |.-----.-----.-----.| | | |.----.| |_
 | - || _ | -__| || | | || _|| _|
 |_______|| __|_____|__|__||________||__| |____|
          |__| W I R E L E S S F R E E D O M
 -----------------------------------------------------
 P44-LC-X 1.6.2, r11364-ef56c85848
 -----------------------------------------------------
root@p44_lc_x_40472953:~#
Depending on the operating system, there are also more convenient ways to click an ssh connection using the DNS-SD or uPnP-SD info instead of entering the IP address manually. The Terminal.app of macOS for example shows available devices in the LAN under the menu item New remote connection... (Cmd-Shift-K). In putty you can save connection data to have to enter it only once.
Change password!
A P44-DSB-X or P44-LC-X device is connected to the LAN and therefore normally to the Internet. Depending on the configuration of the LAN and the device, not only the web interface but also the ssh port can be reached from the internet. Root access via ssh gives complete control over the device, so at this point it is even more important to change the password!. This can be done by entering passwd (Enter). After that the new password will be requested and checked in a second step.
So it is recommended to set your own root password first:
root@p44_lc_x_40472953:~# passwd
Changing password for root
New password: (invisible input)
Retype password: (invisible input)
passwd: password for root changed by root
Show running log via command line
To see what the device is doing while experimenting, it is handy to have a running log in a console/terminal window. For this you can use the command p44l. Entered without parameters it shows the last 10 log lines and all new ones (until abort with Ctrl-C).
root@p44_lc_x_40472953:~# p44l
[2021-12-14 18:40:16.779 N] === collected devices from all vdcs -> initializing devices now

[2021-12-14 18:40:16.779 N] vDChost 39497DAA195757CFC0A27D142CDD84C000 (RPi 3B+ Lego blue): Starting global main script
[2021-12-14 18:40:16.800 W] LEDchains: Specified area needs 23 more LEDs than actually are available: WS2813.GRB:rpi:300:0:17:0:19:X
[2021-12-14 18:40:16.816 N] vDChost 39497DAA195757CFC0A27D142CDD84C000 (RPi 3B+ Lego blue): Global mainscript script finished running, result=undefined [undefined] // no return value
[2021-12-14 18:40:16.816 N] === initialized all collected devices
[2021-12-15 11:47:55.755 N] avahi: starting client
[2021-12-15 11:47:56.686 N] discovery: successfully published services as 'plan44.ch P44-LC-X "RPi 3B+ Lego blue" #40472953'.
[2021-12-15 12:17:49.972 N] vDC 72A98353DB885951800CECB2CB0FB17A00 (RPi 3B+ Lego blue hue): starting in-operation recollect
[2021-12-15 12:17:49.973 N] vDC 72A98353DB885951800CECB2CB0FB17A00 (RPi 3B+ Lego blue hue): in-operation recollect done
^C
p44l can also be called with a parameter, e.g. p44l 6, to change the loglevel and then display the log. By default, the loglevel is set to 5, which means LOG_NOTICE (only important state changes are displayed). For more detailed tracking of what is happening, level 6, LOG_INFO is recommended. Super detailed is level 7 LOG_DEBUG, but then the performance may suffer because of the many log output. The loglevel can also be changed in the webinterface, as well as via the p44script functions loglevel() and logleveloffset(). With p44l -h even more options of p44l are displayed.
Load latest firmware
The firmware for P44-DSB and P44-LC is under continuous development. However, the disk images available for download are not continuously updated, so the Check for new firmware version... function in the System tab should be called after commissioning to install the latest version. The latest release notes can also be found here.
Those who always want to try out the very latest enhancements and improvements can upon request via email by providing the serial number to unlock his/her device for beta testing versions. The (English) release notes of the beta versions can be found here).
What works out-of-the-box?
Both P44-DSB-X and P44-LC-X are intended for home-built lighting, sensor and input devices. That is, "out of the box" there is not too much to try yet. The interesting things will come when e.g. smart LED strips are connected to the RaspberryPi. See the instructions under projects.
There are two exceptions:
-
If you have Philips/Signify hue\ lights and the corresponding hue bridge, you can add these lights directly as lights to a P44-DSB-X or P44-LC-X with a few clicks. How to do this is explained in the corresponding manuals for the commercial plan44 products (Manual P44-DSB-E, Manual P44-LC-DE).
-
To try out the operation without hardware, there are the console devices. They behave in the system like real devices (lamps, inputs, etc.), but are only simulated, and show their state in the log. For example, a simulated color lamp is created:
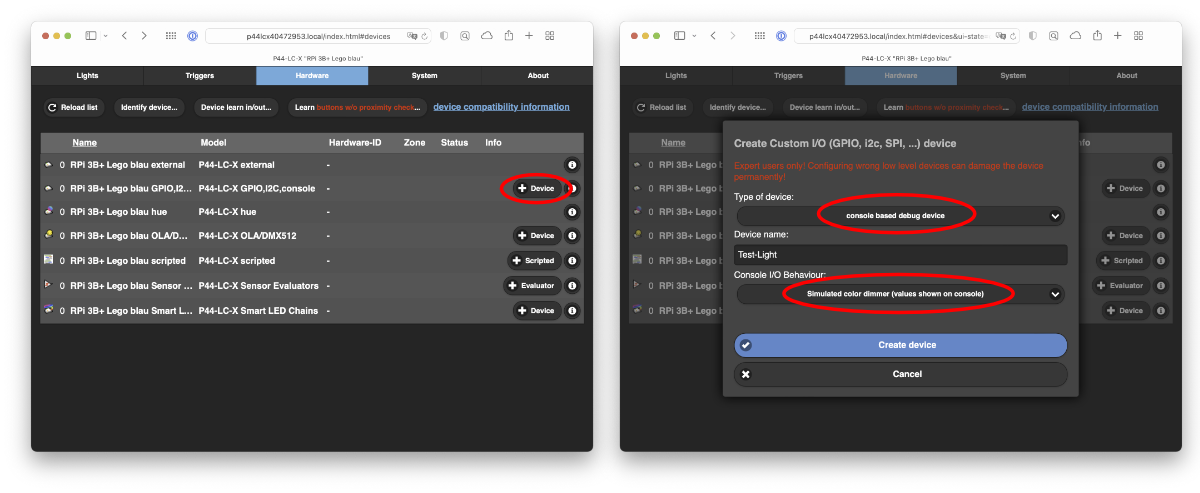
After creation a color lamp appears in the list, which can also be adjusted in brightness and color via the gear icon. In the running log ( see above )(#logging) it will look like this
[2021-12-15 17:19:07.324 N] --- added device: 9D126FB8D8BB5A98800108D97590E47A00 (not yet initialized)
[2021-12-15 17:19:07.425 N] --- initialized device: vdSD 9D126FB8D8BB5A98800108D97590E47A00 - NOT YET announced
                            - Output Channels: 6
                            - has output printing channel value(s) to console
[2021-12-15 17:19:07.547 N] vdSD 9D126FB8D8BB5A98800108D97590E47A00 (Test-Light): changes to PRESENT
>>> Console device Test-Light: channel brightness set to 47.45, transition time = 0.000 Seconds: ########################
>>> Console device Test-Light: channel hue set to 3.60, transition time = 0.000 Seconds: #
>>> Console device Test-Light: channel hue set to 21.60, transition time = 0.000 Seconds: ###
>>> Console device Test-Light: channel hue set to 43.20, transition time = 0.000 Seconds: ######
>>> Console device Test-Light: channel hue set to 64.80, transition time = 0.000 Seconds: #########
>>> Console device Test-Light: channel hue set to 72.00, transition time = 0.000 Seconds: ##########
>>> Console device Test-Light: channel hue set to 75.60, transition time = 0.000 Seconds: ###########
What next?
If you have chosen a P44-DSB-X, you are probably already familiar with the concept of rooms and scenes from Digital Strom.
In case of the standalone P44-LC-X it works very similar, only there is no higher-level home automation system, but everything takes place in the P44-LC-X itself - creating rooms, assigning devices (lights, buttons, etc.) to the rooms, and then creating scenes in the rooms. How to do this is described in the Manual for P44-LC-DE (only the explanations for DALI and EnOcean are not relevant for a do-it-yourself P44-LC-X).
If everything worked out so far and plusminus is clear (the details will clarify with practice...), now it's time to tackle a project!
For discussions and questions about P44-DSB-X and P44-LC-X there is also the corresponding section in the plan44.ch forum.
Projects.
Build and configure hardware
- Build LED Torch ("Torch") with SmartLEDs.
- scene script for automatic color temperature according to time of day.
- Scene script for continuous color change.
Further planned tutorials
- Detailed settings of the LED torch
- colored torch with effects
- animate channels per script
- "Expressive Pixels " display
- Programmatic effects with canvas view
Feedback and suggestions about this tutorial gladly accepted!