REPL - Interactive experimentation with p44Script
Use the Integrated Development Environment instead
From Firmware version 2.7.0 / 2.7.0.32 onwards, the P44-xx devices contain a full-featured IDE which is much more comfortable to work with than the simple REPL. The IDE can be opened from the "System" tab and via links below all script text fields. It can also opened at the URL http://ip-of-my-p44-device/ide.html. Docummentation on how to use the IDE can be found here.
REPL examples also work in IDE
Still, the REPL examples shown below can be tried in the IDE' console (lower left panel).
What is a REPL?
REPL is an abbreviation meaning "Read Evaluate Print Loop" (Wikipedia). The script language waits for an input, executes it, outputs the result - and then waits for the next input. Other names for the same thing are console (for JavaScript, for example), or shell (command line).
A REPL is useful to try out single script commands, possibly simple sequences of a few lines, without writing, saving and executing a "real" script. The REPL can also be useful for debugging existing scripts, for example to query or change the current contents of variables or other system states.
Please note!
In general the REPL gives direct access to many functions and internal mechanisms. This can achieve many things, but if used carelessly can also mess up normal operation, and in extreme cases can cause the whole device to crash. It is therefore recommended to use the REPL only on a device from which a configuration backup has been created and saved beforehand, and to which no sensitive hardware is connected.
REPL in P44-xx devices
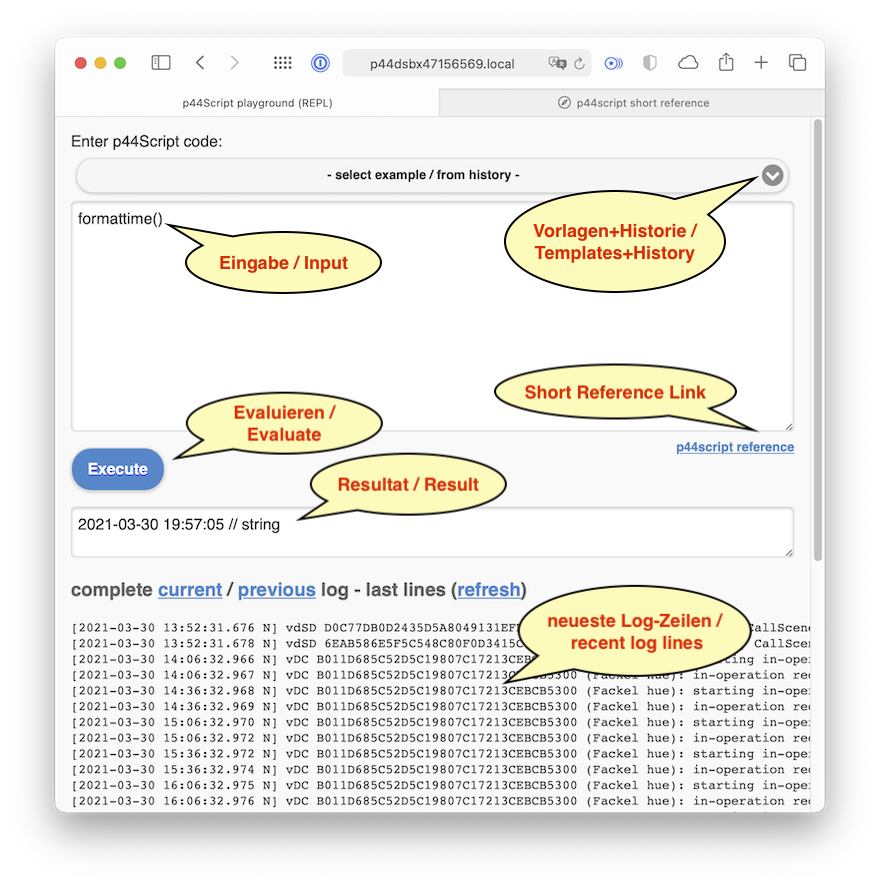
The P44-xx devices with web interface provide the REPL as a simple form at the URL http://ip-of-my-p44-device/repl.html:
Examples
Current date and time
The screenshot above shows how to output the current time:
-
Input:
formattime() -
Press the
Executebutton: -
Output:
2021-03-30 19:57:05 // String
The output shows the result, and adds a comment behind it with the data type of the result.
Along with the output, the log section below is also reloaded. This makes log entries caused by the entered script command immediately visible.
Create log entries
The log() function allows to write to the device log from scripts:
-
Input:
log('This is a log entry') -
Output:
This is a log entry // string -
In the log appears:
[2021-03-30 20:20:50.912 N] Script log: This is a log entry
The log() function with one argument prints this in loglevel 5 ("Notify", see N after the date).
However, with two arguments, the loglevel can also be specified explicitly:
-
Input:
log(4, 'This is a WARNING') -
Output:
This is a WARNING // string -
In the log appears (as "Warning", see
Wafter the date):[2021-03-30 20:25:40.729 W] Script log: This is a WARNING
Note
What actually appears in the log depends on the globally set log level. This is set to 5 ("notify") by default, but can be set on the "log" page of the normal web interface and via loglevel().
Evaluate expressions - "Calculate
Script commands can simply be expressions with numbers:
-
Input:
7 * 6 -
Output:
42 // numeric
But also expressions with strings:
-
Input:
"Hello world" + " at: " + formattime() -
Output:
Hello world at: 2021-03-30 20:22:20 // string
Variables
The input in the REPL is executed in the same Script context as the so-called Mainscript (see box), which means that the variables defined with var are the same. That means that in the REPL you can inspect and also change the variables of the mainscript.
What is the mainscript?
The mainscript is a kind of "main program" for a device, which starts at startup of the whole device, and depending on its contents, may stay active all the time, or maybe just initializes a few things at startup. By default the mainscript is empty.
Attention
Accessing mainscript variables can be very handy e.g. for debugging, but also carries the danger of accidentally overwriting a variable of the mainscript and thus disturbing the progress of the script.
Variables can be addressed simply by their name:
-
Input:
testvar -
Output:
// *** Error: 'testvar' unknown here (ScriptError:5)
This means that a variable testvar does not exist yet (neither in the current Scriptcontext nor as a global, i.e. accessible from all scripts). So we define it:
-
Input:
var testvar -
Output:
null // uninitialized variable
Now the variable exists, but it has no value yet, or the "value" null (equivalent to undefined). At this point a special feature of p44script can be seen: null values can have an "annotation", i.e. a comment. In this case the information "uninitialized variable". This helps to understand why a value is null. Here, because no value has been assigned yet.
-
Input:
testvar = 21 * 2 -
Output:
42 // numeric
From now on testvar is defined:
-
Input:
testvar -
Output:
42 // numeric
Device access (P44-DSB, P44-LC)
Devices (lights, buttons, sensors etc.) connected to the corresponding P44-DSB/P44-LC can be accessed directly. This can be done either by the dSUID of the device (which is recommended for long-lived scripts, because the dSUID is a stable identification of a device), or by the name (practical for tests, not recommended for long-lived scripts, because the name might be changed sometime by the user).
For the following examples, assume that there is a light with the name "lamp" in the system.
-
Input:
device('lamp') -
Output:
/* device */
{}
Since the result is a device, it has no actual "value", it just returns 0. But the comment - "device" - indicates that it is a device object. A device object has various methods and properties, see "Accessing devices and API" in the Quick Reference. For example, the brightness of the "lamp" can be read as follows:
-
Input:
device('lamp').output.channel('brightness') -
Output:
41.96078431372549 // value source
The result is a number (brightness in %) but the comment now says "value source" (with older FW possibly "input value"). A value source has not only a numeric value, but can also be used as a trigger in different situations. For example, you can wait for the next change of a value source:
-
Input:
await(device('lamp').output.channel('brightness'), 30) -
Now waits up to 30 seconds for a change in brightness
-
Output:
...running... -
If there is no brightness change within the 30 seconds, there is a timeout:
null // await timeout -
But if within the 30 seconds e.g. a scene is called, which changes the brightness (here: switch off), immediately comes:
0 // value source
Value sources can be used e.g. in evaluator conditions or with the on(...) {...} statement. In evaluators there is a more convenient choice of possible sensor value sources, but with the device(...).output.channel(...) syntax output values can now be monitored in evaluators.
Pushbuttons are also value sources (assumption: there exists a pushbutton named "pushbutton" in the system):
-
Input:
await(device('Button').button(0), 30) -
Output after briefly pressing the button (off-side if it is a rocker, the on-side would be
button(1)):1 // value source
The value 1 means: button pressed once briefly. But if the button is held, the result is 5 (button held). The other values are 2,3,4 for double, triple and quadruple click, and 0 for release after longer hold.