Examples of custom devices implemented in p44script
An implementation of a custom device always consists of two parts:
-
the so-called init-message, which describes the type of device as it should be visible in the Smarthome system. The init-message must be entered when the device is created and cannot be changed later without deleting it and creating it again (from the point of view of the SmartHome system, it is then a new, different device).
-
The actual implementation in p44script. This can be changed again and again until the function is as desired.
Complete Documentation
For complete documentation please see the Custom Devices page with full specification of the external device API (init message and other device communication)
Create Custom-Device
A new device is created with the "+ Scripted" button:

In the appearing dialog the init-Message can be entered.

A valid init message must be entered here. A complete documentation of the init message can be found here; for the first experiments it is recommended to take one of the following examples.
Please note
- The init message is compatible with the init messages used via the external device API via TCP socket for externally implemented devices. However, for devices implemented in p44script it is not necessary to specify a 'uniqueid', and usually not recommended.
- For p44Script-implemented devices, the init message can be spread over several lines and provided with C-style comments
/* ... */(while the init message via the external device API must always be on a single line).
Edit custom device implementation
The implementation can be customized at any time using the edit button (pencil icon)

Simple scripts can be entered directly in the appearing dialog, but for longer/more complex scripts it is recommended to use the built-in p44script IDE providing a comfortable code editor (via the link at the bottom right of the input field)
In the following examples the JSON init-Message and the script code of the Implementation are shown in separate text fields, from which the examples can be easily copied and pasted.
Ready-to-use examples
Internet watchdog
This simple example implements a switch signal device that indicates whether the internet connection is working or not.
Init message (details here):
{
  'message':'init',
  'inputs':[ {
    'inputtype':0, 'usage':2, 'group':8, /* schwarz: Joker */
    'hardwarename': 'Internet-Test',
    'updateinterval': 300, 'alivesigninterval': 900
  }]
}
Implementation (details of the content of the message() sent here).
// This URL must be reachable on the Internet. The Apple example works as-is,
// but you can take any other URL that is reliably reachable and returns a small
// response (for efficiency reasons)
var testurl = "http://www.apple.com/library/test/success.html"

// every 5 minutes:
on (every(0:05)) {
  var msg = {'message':'input', 'index':0 }
  try {
    // If "testurl" returns an error free answer within 10 sec, the internet connection is working
    var ans = geturl(testurl, 10)
    log(6, "Internet is ok")
    msg.value = 1
  }
  catch as e {
    // Error or timeout accessing the "testurl".
    log(4, "No internet access")
    msg.value = 0
  }
  message(msg)
}

// Important: signals that it's ok that the script exits here
// Only the handler runs in the background.
// If this "return true" is missing, the implementation will be restarted 20 seconds after
// exit (assuming that an error has occurred)
return true
This creates an input device that tests the internet connection every 5 minutes, and reports the status (1=ok, 0=interrupted).
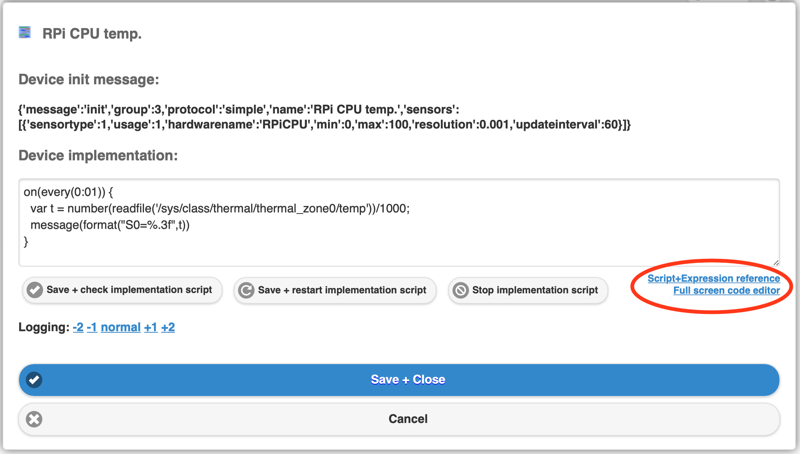
For P44-DSB-X on Raspberry Pi: CPU temperature as sensor value
On RaspberryPi devices the CPU temp is available as a number in the file /sys/class/thermal/thermal_zone0/temp. With the following simple Custom Device a sensor device can be created from it:
Init message (details here):
{
  'message':'init',
  'protocol':'simple',
  'group':3, /* blue/climate */
  'name':'RPi CPU temp.', /* initial name */
  'sensors':[
    /* sensortype1 = temperature, updateinterval = 60 = read once per minute */
    {'sensortype':1,'usage':1,'hardwarename':'RPiCPU','min':0,'max':100,'resolution':0.1,'updateinterval':60}
  ]
}
Implementation (details of the content of the message() sent here).
// Every minute:
on(every(0:01)) {
  // read the value from the file, treat it as a number and scale it (file returns 1/1000 degrees)
  var t = number(readfile('/sys/class/thermal/thermal_zone0/temp'))/1000;
  // report as sensor value
  message(format("S0=%.1f",t))
}

// important: signals that it's ok that the script ends here
// Only the handler is running in the background.
// If this "return true" is missing, the implementation will be restarted 20 seconds after
// exit (assuming that an error has occurred)
return true
This creates a sensor device that reads the current CPU temperature from the system every minute, and reports it as a sensor value to the Smarthome system. It does not differ from any other temperature sensor (e.g. EnOcean devices etc.) in the way it works.

!!! warning "userlevel 1 required".
Because this example uses readfile() with an absolute path, the device must have at least userlevel 1 for security reasons. Production devices have userlevel 0 by default. Experimental DIY devices and devices with beta versions have userlevel 1. The userlevel is defined in /flash/p44userlevel. Thus, for devices with access to the commandline (e.g. P44-DSB-X) the userlevel can simply be set to 1 with echo 1 >/flash/p44userlevel.
Dingz: Dimmer and button
The dingz.ch is a device in the form of a flush-mounted switch, which offers 4 pushbuttons and up to four dimmer outputs, and can do many other things. This device is used here as an example because it has a REST API that can be controlled directly from the LAN for controlling the outputs, as well as being able to report button actions via so-called Action URLs. The following are two examples, one for a dimmer output, the other for a pushbutton input (in similar ways, blind control and motion sensor could also be integrated).
Dingz: Dimmer output
Init message (details here):
{
  'message':'init',
  'name':'dingz dimmer',
  'output':'light'
}
Implementation (details about the content of the received message() m here): For the example to work, the correct IP address of the dingz as well as the correct dimmer index (see dingz documentation) must be entered, see comment in code:
// Configuration
// - IP address of the dingz
var ip='192.168.1.123'
// - which dimmer?
var dimmerindex=0

// implementation
on (message()) as m {
  if (m.message=='channel' && m.index==0) {
    var ramp = 25 // dingz default = 25*10mS
    if (isok(m.transition)) ramp = m.transition*100 // sec -> 10mS
    var post = format(
      'http://%s/api/v1/dimmer/%d/on?value=%d&ramp=%d',
      ip, dimmerindex, m.value, ramp
    )
    log(6, "posting: %s", post)
    posturl(post, 5)
  }
}

return true
This simple implementation integrates the Dingz dimmer, including adjustable transition times on scene calls, as a full-fledged dS light.
Dingz: Button inputs
P44 firmware 2.6.6 or 2.6.6.0 or newer required.
This example makes use of features that only work correctly with firmware 2.6.6 or beta 2.6.6.0 (a single button also works with 2.6.5/2.6.5.9, but several buttons interfere with each other). Please update P44-xx accordingly (activation for beta versions on request).
The button example is a bit more complicated, because here the Dingz must be able to reach the P44 via Action URL (see Dingz documentation) when a button is pressed. For this there is the p44script function webrequest() (see here), which can be used to serve the endpoint /api/json/scriptapi of the P44 webserver.
But because several devices, possibly others than just Dingz, want to use this same endpoint, there needs to be an implementation for all devices together in the so-called mainscript (which can be edited at http://ip-of-my-p44/p44script.html, see also here).
Use IDE from firmware version 2.7.0/2.7.0.27!
As of 2.7.0/2.7.0.27, the simple Mainscript editor has been replaced by the much more convenient p44script IDE. This can be found on the page "ide.html" or can be opened by clicking the corresponding button "Edit Mainscript..." on the "System" tab.
Mainscript code for all DingZ input devices (push button, motion detector) common
The following code must be entered as part of the mainscript so that the P44 can respond to action URLs from the thingz (but there may be other code in the mainscript, in which case the following code should simply be appended below):
// http requests from devices (improved version 2023-01-18)
on(webrequest()) as request
{
  log(6, "webrequest = %s", request)
  try {
    // Process request
    if (isok(request.dingz)) {
      // this is a request from a dingz
      // - forward via dignz_signal_192_168_ip_ip
      var s = ifok(globalvars()['dingz_signal_'+replace(request.peer,'.','_')], false)
      if (isok(s)) s.send(request)
    }
    // always answer
    request.answer({ "status":"ok" })
  }
  catch as e {
    log(4, "Error during request processing: %s", e)
    // even in case of error: answer to avoid client hanging until timeout
    request.answer({ "status":"error" })
  }
}
This mainscript code only needs to be used once, it works to serve any number of pushbutton devices by forwarding the incoming requests to the appropriate device via signal.send().
Configuring the Action URLs
In order for the Dingz to execute appropriate Action URLs when a button is pressed, they must be configured in the Dingz as follows:
- 1x click:
- get://user:password@ip.der.p44.box/api/json/scriptapi?dingz=button1&click=1
- 2x click:
- get://user:password@ip.der.p44.box/api/json/scriptapi?dingz=button1&click=2
- 3x click:
- get://user:password@ip.der.p44.box/api/json/scriptapi?dingz=button1&click=3
- 4x click:
- get://user:password@ip.der.p44.box/api/json/scriptapi?dingz=button1&click=4
- hold:
- get://user:password@ip.der.p44.box/api/json/scriptapi?dingz=button1&click=5
- release:
- get://user:password@ip.der.p44.box/api/json/scriptapi?dingz=button1&click=0
where...
- for user and password, insert the login of the P44-xx (default for P44-DSB: vdcadmin/vdcadmin, for P44-LC: p44lcadmin/p44lcadmin).
- for ip.der.p44.box, insert the correct IP of the P44.
- if it is not the first button, instead of button1, insert button2, 3, or 4.
Note: http is faster
For the action URLs the unencrypted get: is used here. The encrypted (https) gets: works too, but the https connection setup needs about 3 sec on the small CPUs, which is then very noticeable as button delay. Since this call happens on the local network (LAN), and does not go to the Internet, the lack of encryption would only be an issue if the LAN was already considered insecure (read: easily hackable or hacked).
Scripted-Device for Dingz Pushbuttons
Once the above is done, the push button device matching the Action URLs can be created.
Here is the init message for a simple single pushbutton (details here):
{
  'message':'init',
  'group':1, /* yellow/light */
  'name':'dingz button 1', /* initial name */
  'buttons':[
    { 'buttontype':1, 'group':1 }
  ]
}
Alternatively, the following two Init messages can be used in pairs to get two buttons that can be joined in the dSS to from a two-way button, just as it is possible with two adjacent inputs of Digital Strom pushbutton terminal blocks. The following additional fields in the init message make this possible:
- uniqueid: this string can be anything (here as an example:
dingz_twoway_1234), but must be the same for both pushbuttons, and different from any other pushbutton pairs that are to be configured in the same way! - subdeviceindex: must be 0 for one, 1 for the other button.
- combinables: must be set to 2, so that the dSS knows that these pushbuttons can be connected in pairs.
By the way, in this example, specifying "group":8 makes the button a joker, which appears as a yellow light button by default because of the "group":1 within buttons, but can be reconfigured afterwards via dSS, e.g. to gray for blinds control.
Init message for the first button (don't forget to use your own string for uniqueid, it's also sufficient to change the 1234 to another number):
{
  "message": "init",
  "uniqueid": "dingz_twoway_1234", /* same for both parts, but different for each pair! */
  "subdeviceindex": 0, /* first part of two-way pushbutton */
  "group":8, /* joker */
  "buttons": [{
    "buttontype": 0, "group":1, "combinables": 2, "hardwarename": "up"
  }]
}
Init message for the second button (differences: subdeviceindex 1 instead of 0, hardwarename down instead of up, where this name is only for the log, for the function it doesn't matter - but same uniqueid as for the first button!)
{
  "message": "init",
  "uniqueid": "dingz_twoway_1234", /* same as first part */
  "subdeviceindex": 1, /* other part of the two-way switch */
  "group":8, /* joker */
  "buttons": [{
    "buttontype": 0, "group":1, "combinables": 2, "hardwarename": "down"
  }]
}
The implementation, the same for all of the init message variants shown above (the correct IP address of the thingz as well as the correct button must be entered, see comment in the code):
// configuration
// - IP address of the dingz
var ip='192.168.1.123'
// - which button?
var button="button1"

// implementation (improved 2022-10-18)
var signame = 'dingz_signal_'+replace(ip,'.','_')
var sig
if (!isok(globalvars()[signame])) {
  // signal for this IP does not yet exist: create new one
  globalvars()[signame] = signal()
}
// using existing or newly created signal
sig = globalvars()[signame]

on (sig) as s {
  log(6, "s = %s", s)
  if (s.dingz==button) {
    // this is the right button
    var msg = {'message':'button', 'index':0 }
    if (s.click==0) {
      // button released
      msg.value = -10
    }
    else if (s.click==5) {
      // button held longer
      msg.value = -11
    }
    else {
      // 1..4-fold click, feed directly (negative value)
      msg.value = -s.click
    }
    message(msg)
  }
}

return true;
Now the Dingz button works like a normal dS button, including multiple clicks and dimming/deep-off with long press. If you don't want multiple clicks or dimming behavior, just leave the corresponding Action URLs in the Dingz empty.
Dingz: Motion Detector
P44 firmware 2.6.6 or 2.6.6.0 or newer required
This example makes use of features that only work completely correctly with firmware 2.6.6 or beta 2.6.6.0 or later.
Mainscript code same as DingZ button, see there
This example needs the same piece of code in the mainscript as DingZ-Button to receive events from DingZ. If this is not already there from setting up a push button, it needs to be entered once (for all motion sensors and push buttons together), see here in the description of DingZ push button.
Configuration of the Action URLs.
In order for the Dingz to execute appropriate Action URLs when motion occurs, they must be configured in the Dingz as follows:
- dayURL:
- get://user:password@ip.der.p44.box/api/json/scriptapi?dingz=motion_internal&state=3
- twilightURL:
- get://user:password@ip.der.p44.box/api/json/scriptapi?dingz=motion_internal&state=2
- nightURL:
- get://user:password@ip.der.p44.box/api/json/scriptapi?dingz=motion_internal&state=1
- timer off:
- get://user:password@ip.der.p44.box/api/json/scriptapi?dingz=motion_internal&state=0
where...
- for user and password the login of the P44-xx (default for P44-DSB: vdcadmin/vdcadmin, for P44-LC: p44lcadmin/p44lcadmin) is to be used.
- for ip.der.p44.box the correct IP of the P44 must be used.
- if it is not the internal sensor, use motion_external instead of motion_internal.
Scripted-Device for Dingz motion detector
Init message for the motion detector:
{
  "message":"init",
  "modelname":"DingZ_Motion",
  "colorclass":6,
  "inputs": [
    {
      "inputtype":5,
      "usage":1,
      "group":6,
      "hardwarename":"motion"
    }
  ]
}
The implementation (the correct IP address of the thingz as well as the type of the melders must be entered, see comment in the code):
// configuration
// - IP address of the dingz
var ip='192.168.x.x'
// - which input
var input="motion_internal"

// implementation (improved 2022-10-18)
var signame = 'dingz_signal_'+replace(ip,'.','_')
var sig
if (!isok(globalvars()[signame])) {
  // signal for this IP does not yet exist: create new one
  globalvars()[signame] = signal()
}
// using existing or newly created signal
sig = globalvars()[signame]

on (sig) as s {
  log(6, "s = %s", s)
  if (s.dingz==input) {
    // this is the right input
    var msg = {'message':'input', 'index':0 }
    if (s.state>0) {
      // motion detected
      msg.value = 1
    }
    else {
      // no motion detected
      msg.value = 0
    }
    message(msg)
  }
}

return true;
myStrom switching socket: Simple HTTP API
From mystrom.ch there are switching sockets that can be connected via WiFi and switched and programmed via an app. This device is used here as an example because it has a simple API that can be controlled directly from the LAN. Using this API, such an outlet can easily be used as a switchable output for the smarthome system (} {:target="_blank"without depending on an external cloud!):
2023-09-12: Added error handling
The original examples did not have any error handling for the case that the myStrom device is not accessible via http. This case is is now handled correctly in the supplemented examples, and switches the devices inactive, so that they are greyed out in the P44-xx and the dSS (and marked as "not reachable" in matter).
Init message (details here):
{
  'message':'init',
  'output':'light', /* with output of type "light"... */
  'dimmable':false, /* ...but not dimmable */
  'colorclass':8, /* universally usable, in Digital Strom: black joker terminal */
}
Implementation (details of the content of the received message() m here): For the example to work, the correct IP address of the socket must be entered, see comment in code:
// the correct IP address of the socket must be entered here
var baseurl = "http://192.168.1.42"

// handle messages from the system (here: change of output value)
on (message()) as m {
  // if the message concerns the channel with index 0 (=brightness)...
  if (m.message=="channel" && m.index==0) {
    try {
      // access mySTROM API and switch on if brightness > 50%, otherwise switch off
      geturl(baseurl + format('/relay?state=%d', if(m.value>50, 1, 0)), 5)
      message({ "message":"active","value":true }) // device responds: set active
    }
    catch as err {
      log(6,"mystrom at url %s does not answer correctly: %s", baseurl, err)
      message({ "message":"active","value":false }) // device does not respond: set inactive
    }
  }
}

return true // it's ok that the script ends here
This creates a device whose output can be set directly in the P44-xx web interface (via the gear icon), and behaves in the Digital Strom Smarthome with all functions (room assignment, scene programming, etc.) like any other on/off switch actuator.
The myStrom sockets can also measure the current drawn, and report back the current switching state (useful if this has been changed with the button on the socket). This can also be used with a slightly more advanced implementation:
Init-Message (new line sensors is added, details see here):
{
  'message':'init',
  'output':'light', /* with output of type "light"... */
  'dimmable':false, /* ...but not dimmable */
  'colorclass':8, /* universally usable, in Digital Strom: black joker terminal */
  /* definition of a power sensor */
  'sensors':[{"sensortype":14, "usage":0, "hardwarename": "power", "min":0, "max":2300, "resolution":1, "updateinterval":30, "alivesigninterval":300}]
}
Implementation, which now additionally polls the status every 30 seconds, and reports back the effective state of the output (relay) as well as the power consumption (power).
function updatestate()
{
  try {
    var t = geturl(baseurl + '/report');
    log (7, "myStrom reply = %s", t)
    var state = json(t);
    log (6, "myStrom state = %s", state)
    if (isvalid(state.relay)) {
      var msg = { "message":"channel","index":0 }
      msg.value = if(state.relay, 100, 0);
      message(msg)
    }
    if (isvalid(state.power)) {
      var msg = { "message":"sensor", "index":0 }
      msg.value = state.power;
      message(msg)
    }
    message({ "message":"active","value":true }) // device responds: set active
  }
  catch as err {
    log(6,"mystrom at url %s does not answer correctly: %s", baseurl, err)
    message({ "message":"active","value":false }) // device does not respond: set inactive
  }
}

// the correct IP address of the socket must be entered here
var baseurl = "http://192.168.1.42"

on (message()) as m {
  if (m.message=="channel" && m.index==0) {
    try {
      // access mySTROM API and switch on if brightness > 50%, otherwise switch off
      geturl(baseurl + format('/relay?state=%d', if(m.value>50, 1, 0)), 5)
      message({ "message":"active","value":true }) // device responds: set active
    }
    catch as err {
      log(6,"mystrom at url %s does not answer correctly: %s", baseurl, err)
      message({ "message":"active","value":false }) // device does not respond: set inactive
    }
  }
}

// every 30 seconds
on (every(30)) {
  // Read status
  updatestate()
}

// read current state immediately on device startup
updatestate()

return true // it's ok that the script ends here
The new device now has an additional sensor input that shows the current power consumption.
Virtual Weather Station
The following example uses the free openweathermap.org service, which provides pretty good and detailed current weather data for a geographic location and can thus (depending on needs) complement or even replace a dedicated hardware weather station.
This scripted device application was developed, tested in use and made available for this example by Andreas Kleeb of www.redIT.ch Smart Solutions - many thanks!
The example shows that even a more complex device with many sensors can be implemented relatively easily.
Please note
To query the weather data from openweathermap.org, an account must be created there. In this account an API key can be generated, which must be inserted in the implementation script at the designated place. A "How to Start" guide is available here.
Init message (details here):
{
  'message': 'init',
  'protocol': 'simple',
  'group': 8, /* Joker */
  'name': 'OpenWeatherMap.org', /* initialer Name */
  /* Definition der Wetter-Sensoren */
  'sensors': [
    /* S0 */ { 'sensortype': 1,  'usage': 2, 'group': 0, 'hardwarename': 'temperature',   'min': 0, 'max': 100,   'resolution': 0.1, 'updateinterval': 120 },
    /* S1 */ { 'sensortype': 18, 'usage': 2, 'group': 0, 'hardwarename': 'pressure',      'min': 0, 'max': 1200,  'resolution': 1,   'updateinterval': 120 },
    /* S2 */ { 'sensortype': 2,  'usage': 2, 'group': 0, 'hardwarename': 'humidity',      'min': 0, 'max': 100,   'resolution': 1,   'updateinterval': 120 },
    /* S3 */ { 'sensortype': 29, 'usage': 2, 'group': 0, 'hardwarename': 'visibility',    'min': 0, 'max': 10000, 'resolution': 1,   'updateinterval': 120 },
    /* S4 */ { 'sensortype': 13, 'usage': 2, 'group': 0, 'hardwarename': 'wind speed',    'min': 0, 'max': 300,   'resolution': 0.1, 'updateinterval': 120 },
    /* S5 */ { 'sensortype': 19, 'usage': 2, 'group': 0, 'hardwarename': 'wind deg',      'min': 0, 'max': 360,   'resolution': 1,   'updateinterval': 120 },
    /* S6 */ { 'sensortype': 23, 'usage': 2, 'group': 0, 'hardwarename': 'wind gust',     'min': 0, 'max': 300,   'resolution': 0.1, 'updateinterval': 120 },
    /* S7 */ { 'sensortype': 21, 'usage': 2, 'group': 0, 'hardwarename': 'precipitation', 'min': 0, 'max': 1000,  'resolution': 0.1, 'updateinterval': 120 },
    /* S8 */ { 'sensortype': 0,  'usage': 2, 'group': 0, 'hardwarename': 'clouds %',      'min': 0, 'max': 100,   'resolution': 1,   'updateinterval': 120 }
  ]
}
Implementation (details of the content of the received message() m here): For this example to work, the correct API key and location must be included in the code, see comments:
function updateweather()
{
  try {
    var t = geturl(baseurl,30)
  }
  catch {
    return true
  }

  log (7, "OpenWeatherMap reply = %s", t)
  var weather = json(t);
  log (6, "OpenWeatherMap weather = %s", weather)

  if (isvalid(weather.main.temp)) {
    message(format("S0=%.1f",weather.main.temp))
  }
  if (isvalid(weather.main.pressure)) {
    message(format("S1=%.1f",weather.main.pressure))
  }
  if (isvalid(weather.main.humidity)) {
    message(format("S2=%.1f",weather.main.humidity))
  }
  if (isvalid(weather.visibility)) {
    message(format("S3=%.1f",weather.visibility))
  }
  if (isvalid(weather.wind.speed)) {
    message(format("S4=%.1f",weather.wind.speed))
  }
  if (isvalid(weather.wind.deg)) {
    message(format("S5=%.1f",weather.wind.deg))
  }
  /* without gust info -> zero gust */
  message(format("S6=%.1f", ifvalid(weather.wind.gust,0)))
  /* Precipitation */
  var precipitation = ifvalid(
    weather.snow['1h'], // Snow..
    ifvalid(
      weather.rain['1h'], // if no snow: rain
      0 // neither snow nor rain
    )
  )
  message(format("S7=%.1f",precipitation))
  /* Irradiation */
  if (isvalid(weather.clouds.all)) {
    message(format("S8=%.1f",weather.clouds.all))
  }
}

// the OpenWeatherMap API key, city and country must be entered here
var openweathertoken = 'API_key'; // API key
var openweathercity = 'Zug'; // Location (name of town)
var openweathercountry = 'CH'; // Location (country)
var baseurl = string('https://api.openweathermap.org/data/2.5/weather?q=' + openweathercity + '%2C' + openweathercountry +  '&units=metric&appid=' + openweathertoken)


// Every 120 Seconds
on (every(120)) {
  // update weather
  updateweather()
}

return true // it's ok that the script ends here
This creates a weather station device with 8 sensors for temperature, pressure, humidity, visibility, wind speed, wind direction, gusts, precipitation and cloud cover.
More examples in German part
Note - more examples in German version
Currently, there are some more examples in the German version of this page that are not yet translated to English (which will happen, eventually).